Tuesday, December 15, 2009

Process of Building the Board


#1 Special glue was poured on the top side of the layer of the board


#2 Rollers were used to spread the glue out on the board face


#3 The second layer of the board was put on the first


#4 Glue was poured once more and steps 1-4 were repeated


#5 The last layer of the board was aligned on and this process was completed


#6 The board was placed on styrofoam that was the same size as the board


#7 A red piece was put on the board to make sure the board would not compress too much. The board with the red piece was placed in a plastic bag


#8 The bag was sealed


#9 The air in the bag was pumped out so the board could harden

Once the board was left for 24 hours it was ready too take out of the bag. Then we were ready too carve and sand it.

Monday, December 14, 2009

Sunday, December 13, 2009

Photos of Finished Board


Photos of Carving


Written Documentation of Board

Describing process using elements/principles of design

The process first starting by carving the edges of the board. There was one long, thick, and rough line on the side of the board, and the objective was to create different angles from that one line. We used the carving tool to do that. When using the carving tool, we had to go in one direction until different angles were carved out, this was done on both sides. The end result of carving was one relatively smooth line with 4 angles on it. After that we used the sanding paper to sand one face of the board. Since the wood on my board travelled from top to bottom, I sanded up and down.
There were different grades of sanding paper starting at 60 and ending at 400, This process took a long time and the end result was one smooth, glassy, and thick board.


Describing to someone

Important things to know when carving are:

  • carve in one direction, going back and forth can create ridges in the board and wood can get caught
  • put force on the carving tool when carving
  • the main objective of carving is to get different angles on the board
  • your hand should be able to travel from one face to the other without going over any corners

Important things to know when sanding are:

  • sand in the direction the wood travels on your board
  • sand the sides at the same time you sand the faces
  • it might be tempting to get to the higher numbers of sanding paper as quickly as possible but the important thing to know is if your base is not solid your product won't be
  • spend the most time at 60-80-100
  • once your base is solid work up
  • your objective is to create a face on the board that feels like glass, and reflect light
  • on my board when I look at it I can see my reflection

Difficulties:

My first difficulty that arose were in the carving part of the process. I had not carved the edges enough and did not carve it to the exact number of angles. Therefore, I had to spend additional time on the caving process.

In the carving process, I accidentally chipped a piece of my board off. Ms. Cockburn told me to tape it to the back of my board. Fortunately, we did not have to glue it back on because when I finished the sanding, it had blended in.

When I first started sanding I was in a bit of a rush to get to the higher numbers and therefore had to spend 3 classes on 60-80

Once I completed sanding, I realized i had not sanded the sides in the process and therefore had to start at 60 for the sides.

One unsolved problem was why at the beginning of class the tips of the sanded edge of the board were rough, I suspected it to be rough because of the class stacking the boards on top of each other. Fortunately, Ms.Cockburn arranged some space in the racks beside the door and we were able to keep them there. After that I did not have that problem.

Techniques:

One technique that worked for me in sanding the sides was going in one direction, as said before if you travel in both direction at the same time you could chip your board which did happen to me.

Another technique was, spend time on one angle and then tilt the carving tool slightly to carve the second angle, as opposed to just carving up and down.

Also, an important technique for me was to switch arms when going in the opposite direction, so my arms could rest between turns.

In sanding, I counted how many times I would move my arm from the top to the bottom of the area. When sanding 60-80-100 I moved my arm more than 100 times for each grade, in 100 and above I moved my arm 50 times. I split the area of sanding into 9 areas as shown below

(left-top) (middle-top ) (right-top)

(left-centre) (middle-centre) (right-centre)

(left-bottom) (middle-bottom) (right-bottom)

Overall, I am very pleased with my board, it took a long time to carve and sand but it was worth it. My board has a very smooth feel to it and I have been to stores where I have felt wood that isn't nearly as smooth. I know from this project that whenever I see handmade wood I will have a different view on it.

Sunday, November 1, 2009

Original Landscape Photos Colour/Black-White

Greyscale 10%


Greyscale
Colour

Landscape Painting Reflective (250+ words)

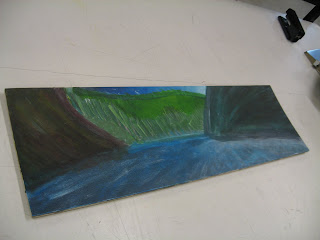
My first step in creating this landscape painting was I painted the outline with white paint. I used straight/curvy lines to do this and the lines met on the horizon. Next, I used the primary colours and secondary colours to fill in the sky/road/mountains/valley. Once that was complete, I used different shades of colours to create a sense of depth on the picture plane. Lastly, I touched all the sides up so the different colours for each object would not overlap each other.


During this process, I learned that the colour of an object does not have to be the same colour you paint on to the landscape. For example, in real life humans picture a road to be dark grey; whereas in my painting I made the road light grey and different shades of blue. Also, we picture mountains to be dark brown and/or black, in my painting I incorporated different shades of all the colours to create a sense of depth on the picture plane.

(Both are shown below)


Another technique I learned was dry-brushing. It is when you apply a little paint to the brush and then paint long lines, what happens is bits of paint are applied to the board and some of the colour underneath is visible. This technique also creates a sense of depth on the picture plane. An example of this is shown on the picture above in the mountain, the light blue greenish colour on top and the brown coming up from the bottom. (sorry about the picture being horizontal i don't know how to fix that)

Also, in Thursday's class I learned that when a person paints without any intention you can produce some amazing lines/colours. I think that when you paint you should let your mind take over and if you make a mistake not to paint over it or clean it off but leave it on and start from there and make something different out of it.

One area I feel I have to improve on is, not being afraid to paint different colours onto objects and not sticking to what a person sees in real life. In the fist couple of classes, I was only using primary and secondary colours to paint my landscape, but when Mrs. Cockburn suggested I use different shades, my painting began to improve. My road is not dark grey and my mountains are not black/brown, they are the colour that I wanted it to be, and because of that my painting looks much better that it did when I was only using the regular colours. To sum it up, I have to experiment with different colours and not be afraid to change something that does not look as it does in real life. I will ultimately create depth and also at the same time portray what is coming out of the individuals mind.

Landscape Painting: Artists

Emily Carr (Canadian)


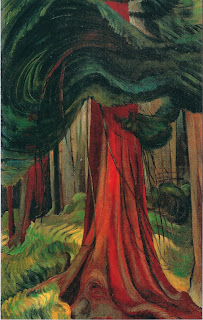
In Emily Carr`s paintings I noticed there is flow of wavy lines, the leaves in the tree for the picture on the top and the sky for the picture on the bottom. This ties in with my landscape picture because I have to make my street wavy and from looking at these 2 paintings it shows a great example of how to incorporate that. To do this in my painting, I will have to use long brush strokes which will start from one side of the road and extend to the other, when I paint that line I will have to make it wavy.

Also, I noticed in Emily Carr`s landscape painting above, the tree`s trunk is not brown and the sky is not entirely blue. This shows we do not have to paint the colours that first come to mind when we think of a specific object. For my painting many of the objects I have that are below the horizon are dark (road, mountains on each side) if I paint it the natural colour that comes to mind my landscape will be too dull, therefore, looking at Emily Carr`s colours I can make them different colours to liven the painting up and create a new perspective to that object. To do that I will make the road different shades of blue/grey, and for the mountain I will make the bottom layer brown and paint in lighter shades of different colours, hopefully that will not make the painting seem as dull.


Etienne Allegrain (International)
1644-1736
French Painter


Whats interesting about Mr. Allegrain's paintings is that his lines meet/vanish at the horizon. In the painting on the top the line that extends farthest out, curves around the trees and then disappears. In my landscape that is exactly what I have to do, my road has to disappear behind the mountain on the right. To do this, I will have to make the line disappear once it touches the mountain to give the impression that it has curved around.

Also, I noticed in the painting on the top the sky graduates from a dark blue to a light blue, it creates a nice affect and my painting also has the same technique, In my painting I start light and then go to an almost blackish blue. I used small strokes and made blocks of different shades of blue, then I blended the sides together so the viewers eye can easily flow from the lightest shade to the darkest.